Optimizing your shipping process is essential for streamlining operations and enhancing customer satisfaction. QuickBooks Desktop now offers an upgraded Shipping Manager designed to simplify shipping logistics, reduce costs, and improve workflow efficiency. Whether you’re using USPS, FedEx, or UPS, this guide provides detailed instructions on how to set up and use the new Shipping Manager in QuickBooks Desktop effectively.
Why Use the New Shipping Manager in QuickBooks Desktop?
The new Shipping Manager is integrated with ShipEngine, enabling users to access discounted USPS rates and manage multiple shipping carriers within QuickBooks. From purchasing shipping labels to managing warehouse addresses, the system helps automate repetitive tasks and keeps all your shipping data centralized.
How to Access the Shipping Manager in QuickBooks Desktop?
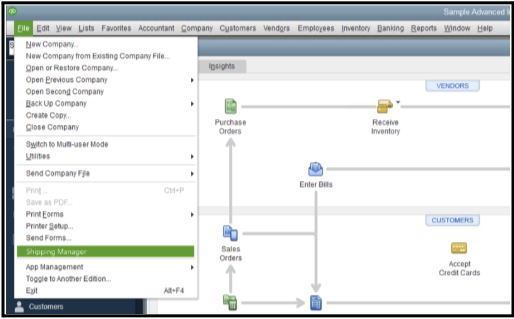
You can open the Shipping Manager from various transaction types or directly through the main file menu:
- From the File Menu: Go to File → Select Shipping Manager
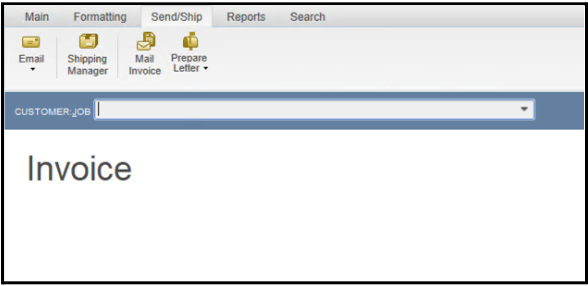
- From Invoices: Open any invoice → Click on Shipping Manager
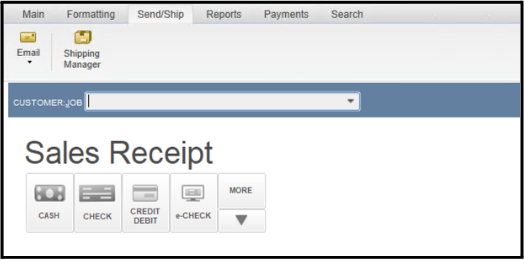
- From Sales Receipts: Open any sales receipt → Choose Shipping Manager
- From Sales Orders
Navigate to the Customer tab → Click Sales Order Fulfillment Worksheet
Select a sales order → In the Action column, click Ship with Shipping Manager
Setting Up the Shipping Manager in QuickBooks Desktop
To begin using the Shipping Manager, follow these steps:
- Click Get Started in the Shipping Manager interface.
- Log in using the Master Admin credentials for your Intuit account.
- Accept the ShipEngine Terms of Service.
- Enter your ship-from address and credit card details for billing purposes.
- Click Confirm to complete the setup.
Once setup is complete, a USPS account is automatically created with exclusive QuickBooks shipping discounts.
Funding Your USPS Shipping Wallet
To purchase USPS labels, you must add funds to your shipping wallet, which is managed by ShipEngine:
- Go to File → Select Shipping Manager
- Click Add Funds, enter the desired amount, then select Add Now
Enable Auto-Funding for Convenience
To avoid interruptions in label purchasing:
- Set Minimum Balance – Choose the balance threshold that triggers auto-refill.
- Add Amount – Decide how much should be added per refill.
- Max Refill Per Day – Limit the number of times auto-funding occurs daily.
- Click Save Rules to activate.
Note: Only the QuickBooks admin can fund the USPS wallet. For issues, contact ShipEngine support directly.
Connecting FedEx and UPS Accounts to QuickBooks
QuickBooks Desktop allows integration with external carriers like FedEx and UPS:
Steps to Add a FedEx Account
- Go to File → Shipping Manager
- Select Manage Carriers → Go to the Additional Carrier tab
- Click Connect Carriers → Choose FedEx
- Review and accept the terms
- Enter your FedEx credentials and click Connect
Steps to Add a UPS Account
- Choose UPS from the Connect Carriers list
- Enter your UPS account information, username, and password
- Click Authenticate Account
Once integrated, your shipping charges are directly billed to the carrier accounts instead of your USPS wallet.
How to Purchase Shipping Labels in QuickBooks Desktop?
You can create shipping labels either independently or while processing transactions:
Create Labels Independently
- Go to File → Select Shipping Manager
- Click Purchase Shipping Label
Create Labels from Transactions
You can generate labels directly from:
- Invoices – Open an invoice → Click Shipping Manager → Choose Purchase Shipping Label
- Sales Receipts – Open a receipt → Click Shipping Manager → Select Purchase Shipping Label
- Sales Orders – Use the Sales Order Fulfillment Worksheet → Select an order → Click Ship with Shipping Manager
Enter Shipping Details
- Input package weight and dimensions
- Click Calculate Rates to compare available shipping options
- Choose your preferred carrier and service
- Select Purchase Now
USPS charges apply to your wallet. FedEx and UPS charges are billed through your linked accounts.
After purchasing, you can:
- Print the label
- Email shipment details to customers
- Paste tracking info directly into the related transaction record
How to View Shipping History in QuickBooks?
To keep track of all shipments:
- Go to File → Select Shipping Manager
- View a list of all shipments, including:
- Creation date
- Transaction type
- Tracking number
- Carrier and service details
Click the three-dot icon (፧) to:
- View more shipment details
- Print the label
- Void a shipment
Voiding Shipping Labels in QuickBooks Desktop
You can void a label as long as it hasn’t been scanned by the carrier and is still within the valid void period:
- Open Shipping Manager
- Locate the shipment
- Click the three-dot (፧) icon → Select Void Label
- Confirm the voiding process
Refunds for USPS labels return to your wallet. Other carriers refund to the original payment method.
Managing Multiple Warehouse Shipping Addresses
If you ship from multiple locations:
- Go to File → Select Shipping Manager
- Click the Settings (⚙️) icon → Choose Ship From Locations
- Select Add New Address → Input full warehouse details
- Choose a default shipping address or select one manually during label creation
Print Shipping Labels Later
If you opt not to print a label immediately:
- Access Shipping History in the Shipping Manager
- Locate the shipment
- Click the three-dot (፧) icon → Select Print Label
Customizing Label Layout and Package Units
Tailor your shipping documents to your business preferences:
- Go to File → Click Shipping Manager
- Click Settings (⚙️)
Adjust Label Layout
- Choose between:
- Letter Format (for standard printers)
- Thermal Format (for thermal label printers)
Set Measurement Units
- Choose:
- Dimensions – Inches or centimeters
- Weight – Pounds and ounces, grams, or kilograms
Conclusion
The updated Shipping Manager in QuickBooks Desktop is a robust tool designed for businesses that want full control over their shipping operations. From accessing carrier discounts to automating repetitive tasks, this feature helps save time, cut costs, and deliver a smoother customer experience. Take full advantage of this tool to elevate your order fulfillment workflow today.
For further assistance, contact QuickBooks Support or ShipEngine Support at 1-844-987-7063 depending on your issue.
Frequently Asked Questions
If you’re facing issues connecting UPS to the Shipping Manager in QuickBooks Desktop Enterprise, make sure your account credentials are correct and check for compatibility with your current version of QuickBooks.
To select ground shipping and request signatures, use the shipping options menu within the Shipping Manager tool. These features are typically available when setting up your shipment details.
Shipping Manager setup for QuickBooks Online may differ from the desktop version. Follow the guided steps within the online version or use an integrated shipping app like ShipEngine or a third-party solution.
This issue can be caused by formatting errors or printer compatibility. Make sure you’re using the latest version of Shipping Manager and that your printer settings are correctly configured for barcode printing.
This error often occurs due to saved credentials not being updated after the upgrade. Try re-entering your password or resetting it through your shipping provider’s account settings.
If you’re encountering errors while adding additional carriers, it may be due to configuration issues or unsupported carriers in the new version. Verify your carrier account details and ensure they’re supported.
While ShipEngine is a common integration, some users may configure Shipping Manager without it. You can also generate shipments independently of invoices, depending on your setup and workflow preferences.
This message indicates a version mismatch. Update your local Shipping Manager software to match the database version or reinstall it using the latest update provided by QuickBooks.
If Shipping Manager is not functioning, check for software updates, compatibility issues, or conflicts with third-party programs. Restart QuickBooks and your computer, and if the problem persists, contact support for help at 1-844-987-7063.

